
Unpacking UPX packer
What is UPX packer?
UPX is an open-source, free, secure, portable, extendable, high-performance executable packer for several executable formats.
The purpose of the packer is to reduce the file size of programs and DLLs reducing disk space, network load times, download times, and other distribution and storage costs. More info https://upx.github.io
In addition to UPX packer, other packers could be commercials and close sources exist like ASpack, ASProtect, AutoIT, DarkCrypt, AvPack, and many more.
How to pack the sample using the UPX packer?
You can download it from the GitHub repo https://github.com/upx/upx/releases and select the appropriate one for your operating system.
After you download the UPX, you can open the Unix-like systems terminal or Windows command prompt (cmd).
Open the terminal and type
up --help
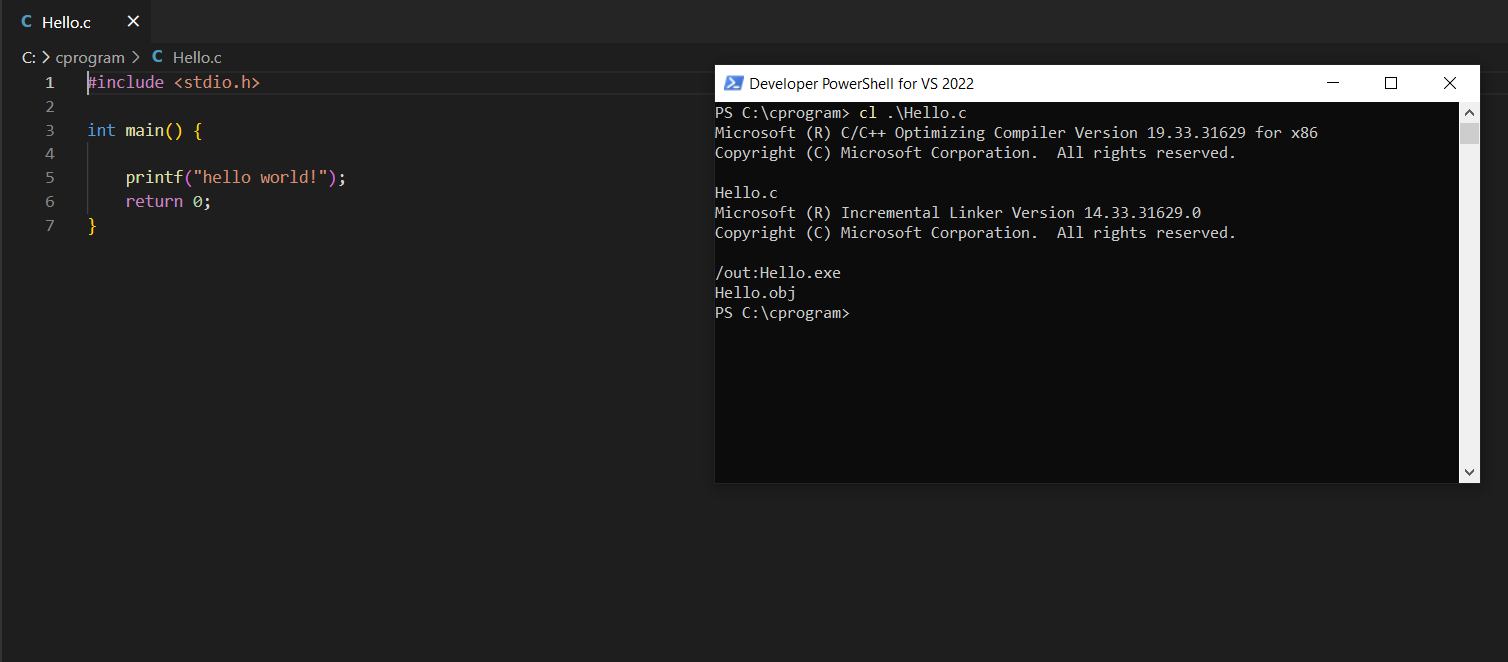
I have a small C program that prints “Hello World!” with the name “hello.c” and I want to use the UPX to pack it.
First I will compile it and output the exe file, using the following command, I am using the MS VC compiler, more info: https://learn.microsoft.com/en-us/cpp/build/reference/compiler-options?view=msvc-170#find-a-compiler-option
cl -o
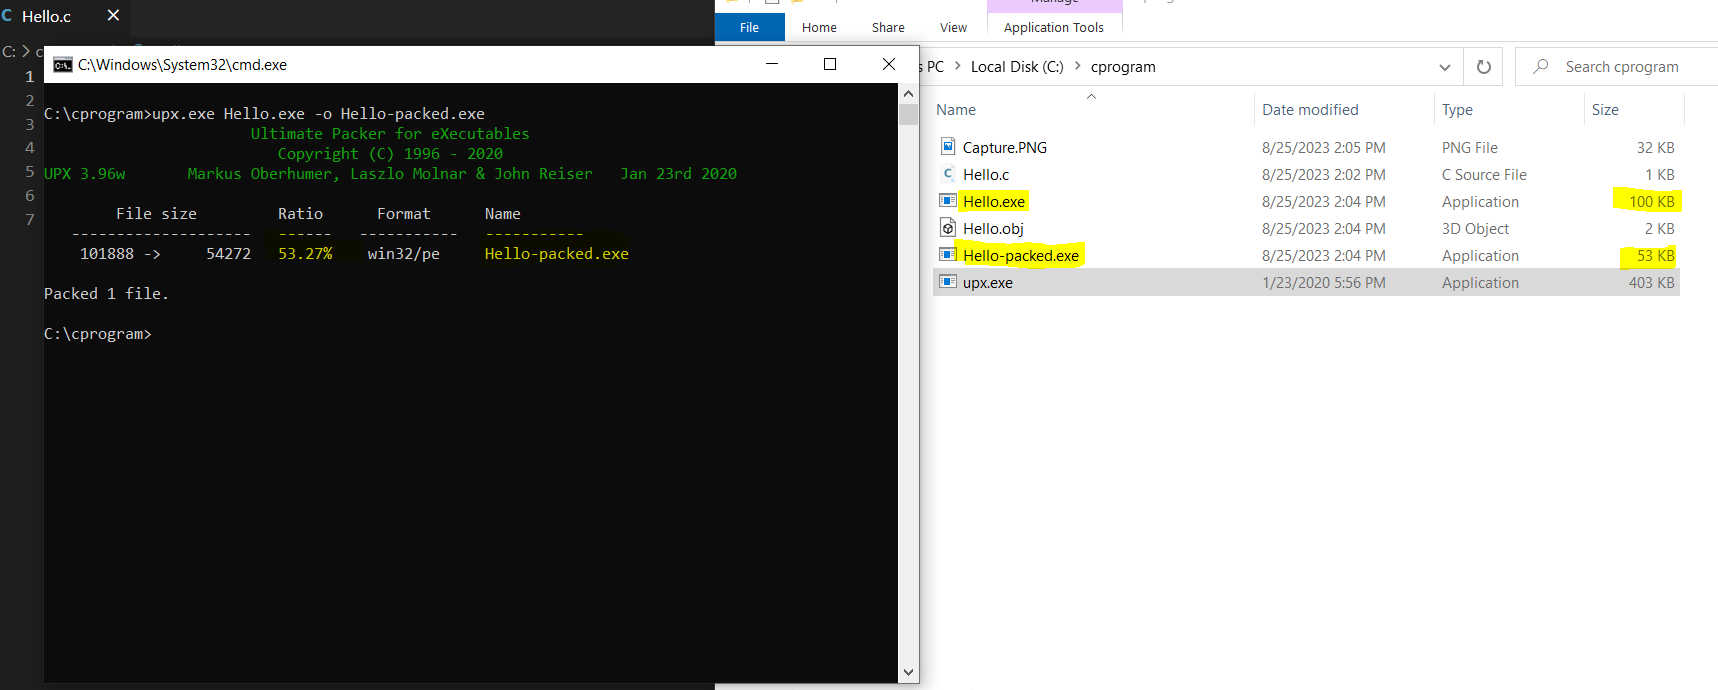
After that, I will pack the sample using the following command
upx hello.exe -o hello-packed.exe
Compare the packed vs. unpacked sample
Let’s see the file size and Portable Executable (PE) metadata of unpacked compared to packed files.
Now I open the two files with PeStudio for PE analyzing, let’s move to sections and imports.
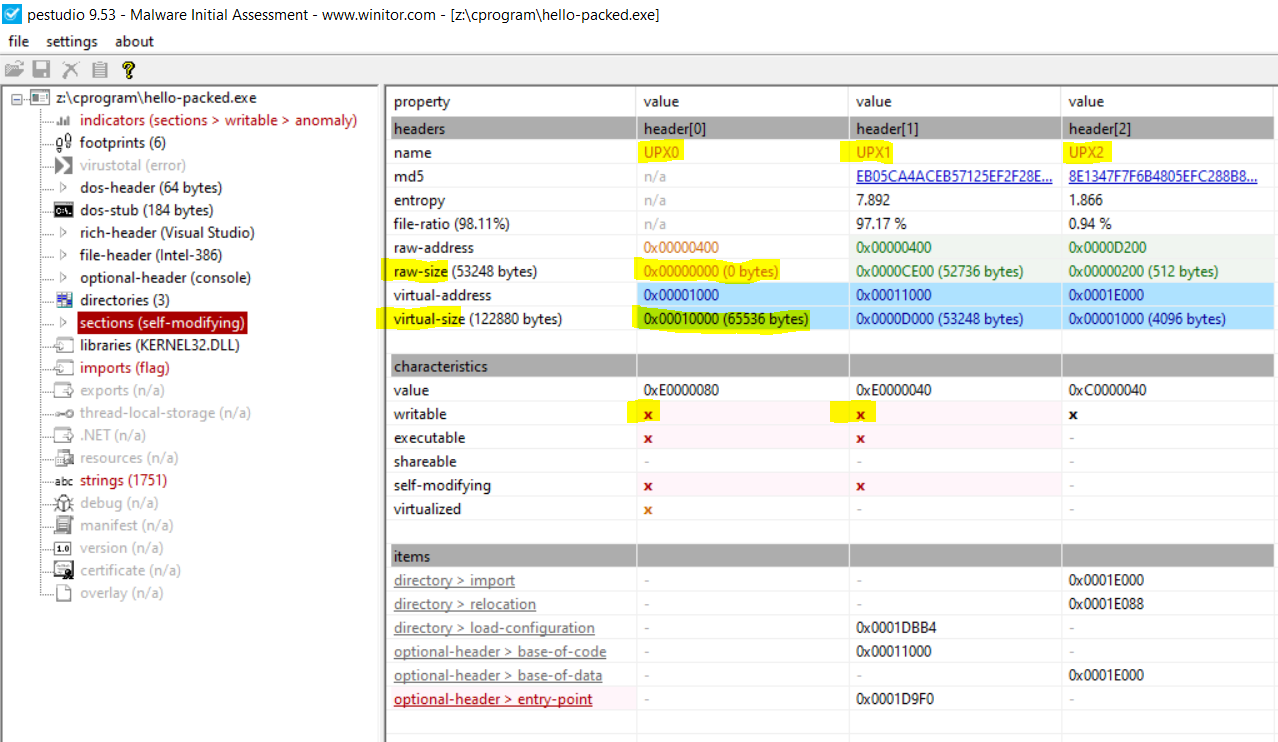
As shown in the image below the packed has different section names (UPX0, UPX1, .rsrc) unlike the unpacked one (.text,.data, .rdata).
How to identify the UPX packing exists?
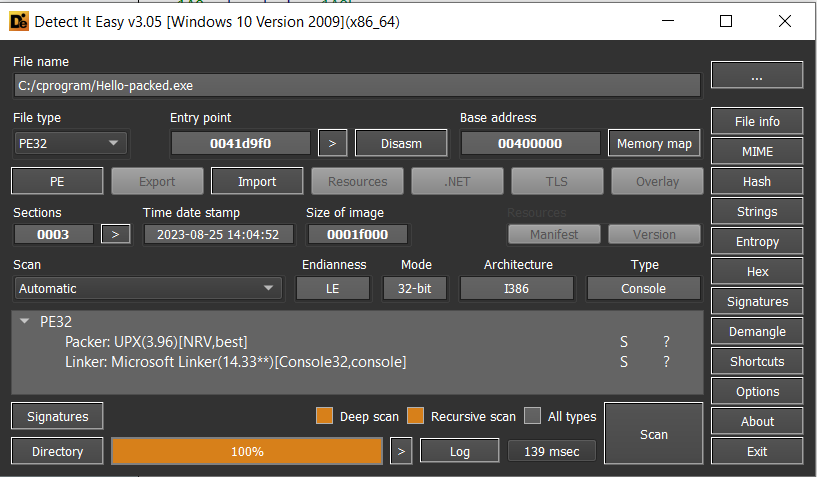
Different tools help you to identify the packer exist one of them Detect-it-easy and PeID tools.
Here Detect-it-easy identify it and PeID
, But what are general things to keep in consideration when identifying the packer exists:
-
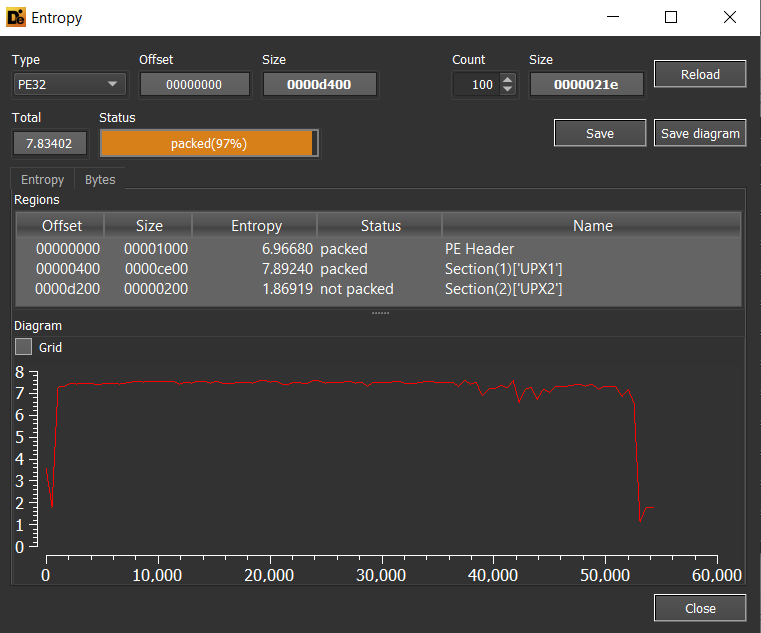
Entropy value (entropy is a value that measures the randomness and compression), if you check the entropy value of some sections you will find it
>=7.0compared with others which unpacked with<7.0 -
Sections’ names, the default for the compiler to use
.text,.data,.rdata, etc. But in UPX case there areUPX0,UPX1, etc. -
The raw size compared with the virtual size, in the case of the UPX you will find that the raw size is
0or much less than the virtual size. -
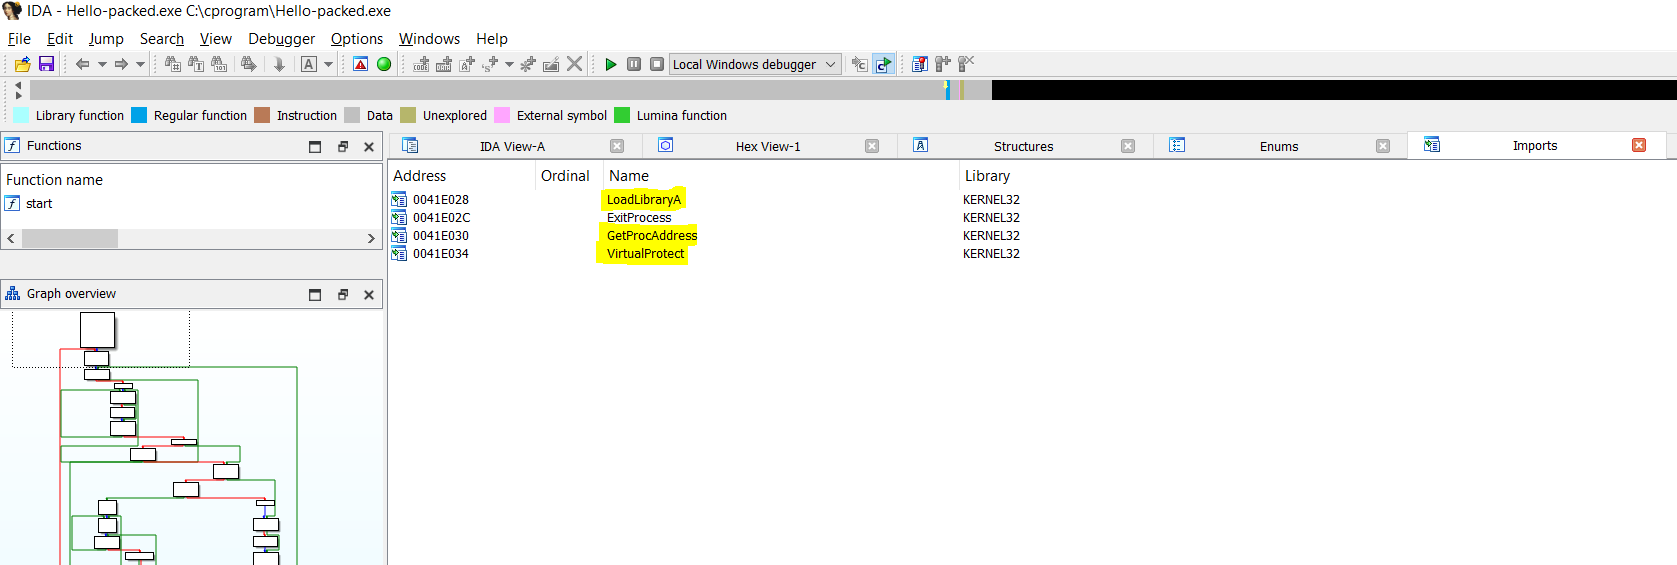
Checking the imports with PeStudio or CFF-Explorer, you will find fewer functions are referenced.
| Function | MSDN Documentation |
|---|---|
VirtualAlloc |
https://learn.microsoft.com/en-us/windows/win32/api/memoryapi/nf-memoryapi-virtualalloc |
VirtualAllocEX |
https://learn.microsoft.com/en-us/windows/win32/api/memoryapi/nf-memoryapi-virtualallocex |
VirtualProtect |
https://learn.microsoft.com/en-us/windows/win32/api/memoryapi/nf-memoryapi-virtualprotect |
VirtualProtectEx |
https://learn.microsoft.com/en-us/windows/win32/api/memoryapi/nf-memoryapi-virtualprotectex |
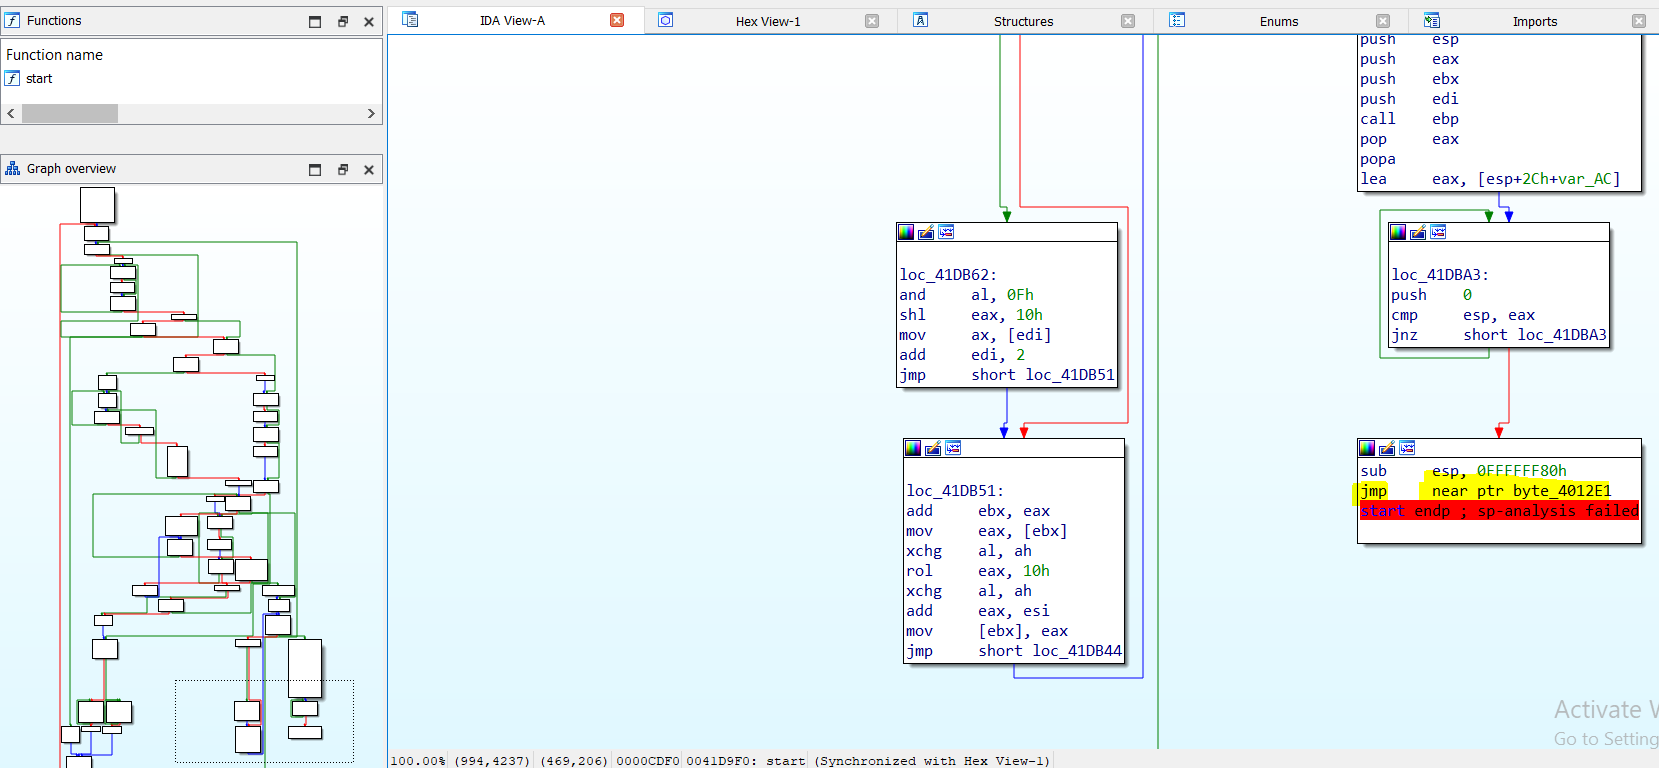
- Tail jump, which is used by the stub to jump to the virtual address at the unpacked entry point. This tail jump you will identify if you open the sample into the IDA disassembler, there is no existing
retinstruction.
How to unpack the UPX sample?
Two options are using the command line and other manually using the xDbg debugger.
Let’s start by using the command line first
upx -d hello-packed.exe --o hello-unpacked.exe
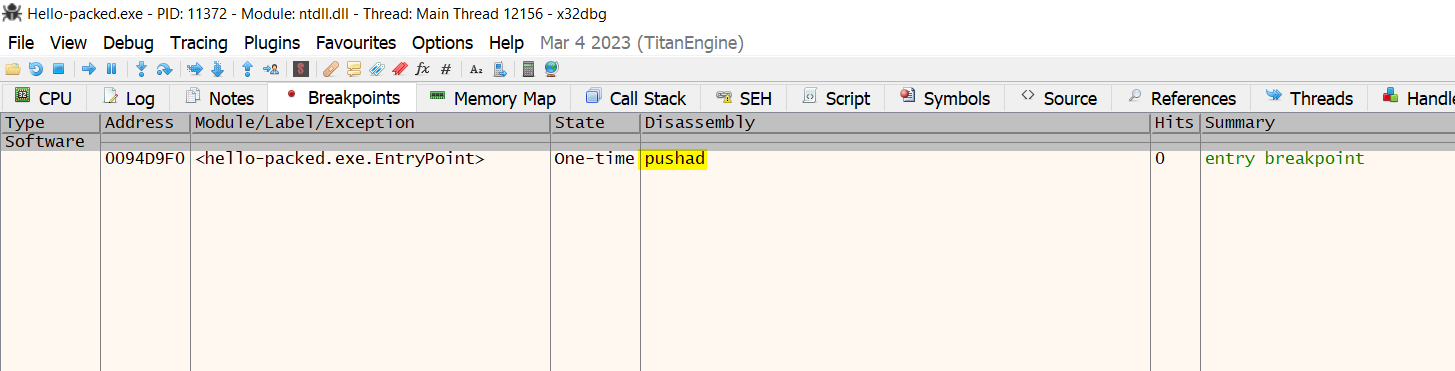
Now let’s start by using it manually using the xDbg debugger, I will open xDbg64 as the sample is 64-bit
Moving to the breakpoints tab, you will find breakpoints at the ntdll.dll and entry point of the sample, press F9 to run and stop at the entry points.
Find the tail jump that could be found using the Graph by pressing g and scrolling down until find it or by converting the address from IDA into xDbg.
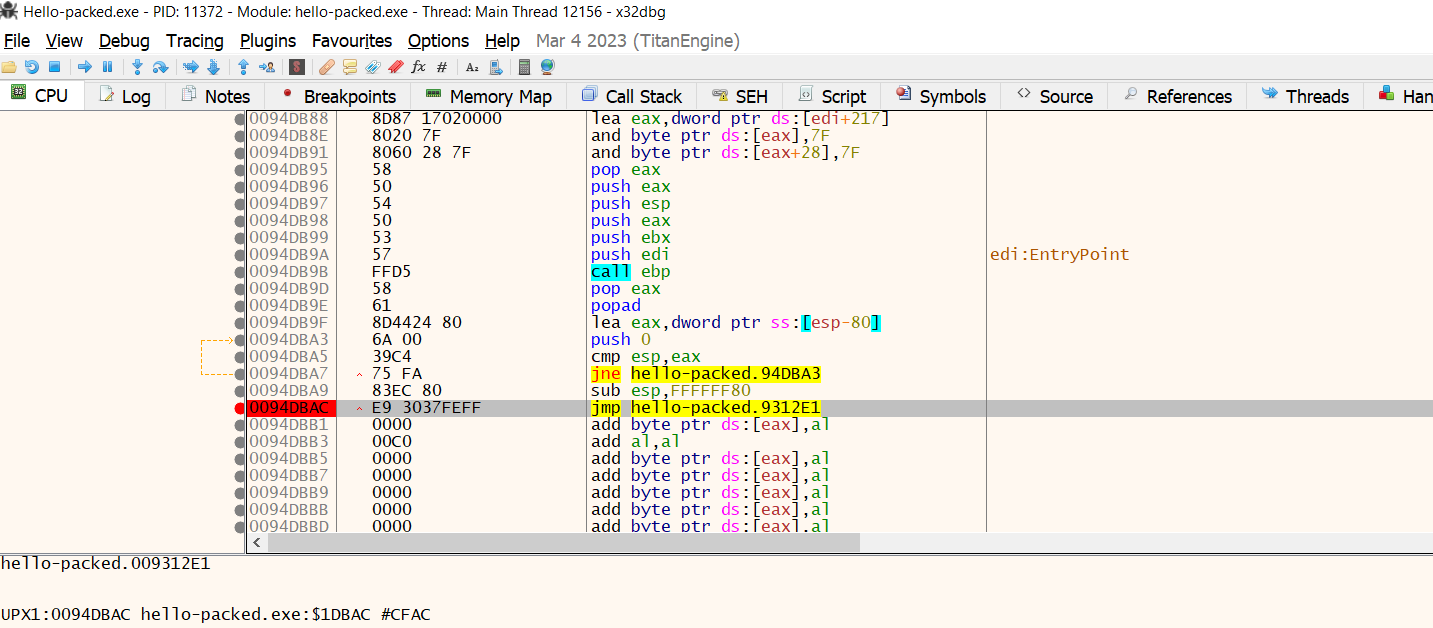
Once you find it, press F2 to create a breakpoint then run F8 for stepping over and continue running. The breakpoint will hit press F7 to step into.
Click on the dump or just right-click and move to the memory location you will find that you are at UPX0 now.
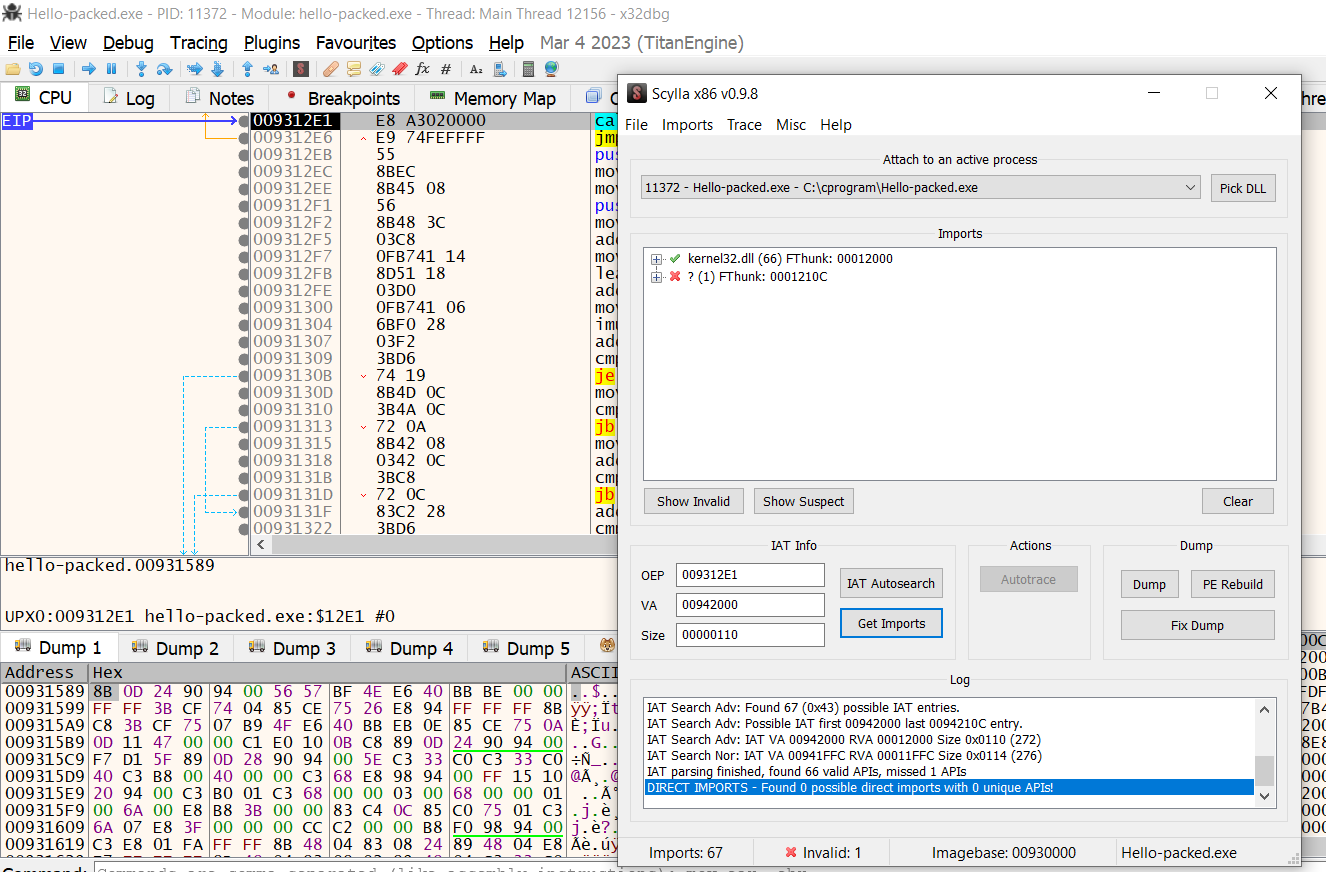
At this point you are the address of the entry point of the sample, there are different methods to extract the dump. The easiest one using the Scylla plugin in xDbg debugger by click on Plugins -> Scylla
Scylla is a good plugin to extract dump from the memory location, there are other tools called
Here I am using Scylla, the Window is showing. It points to the address of the entry point which we are stop there. Click on IAT auto search, imports, and dump.
At the points there are some missing in the alignments, rather than do it manually you can use Scylla by clicking Fix dump which will extract dump_SCY.
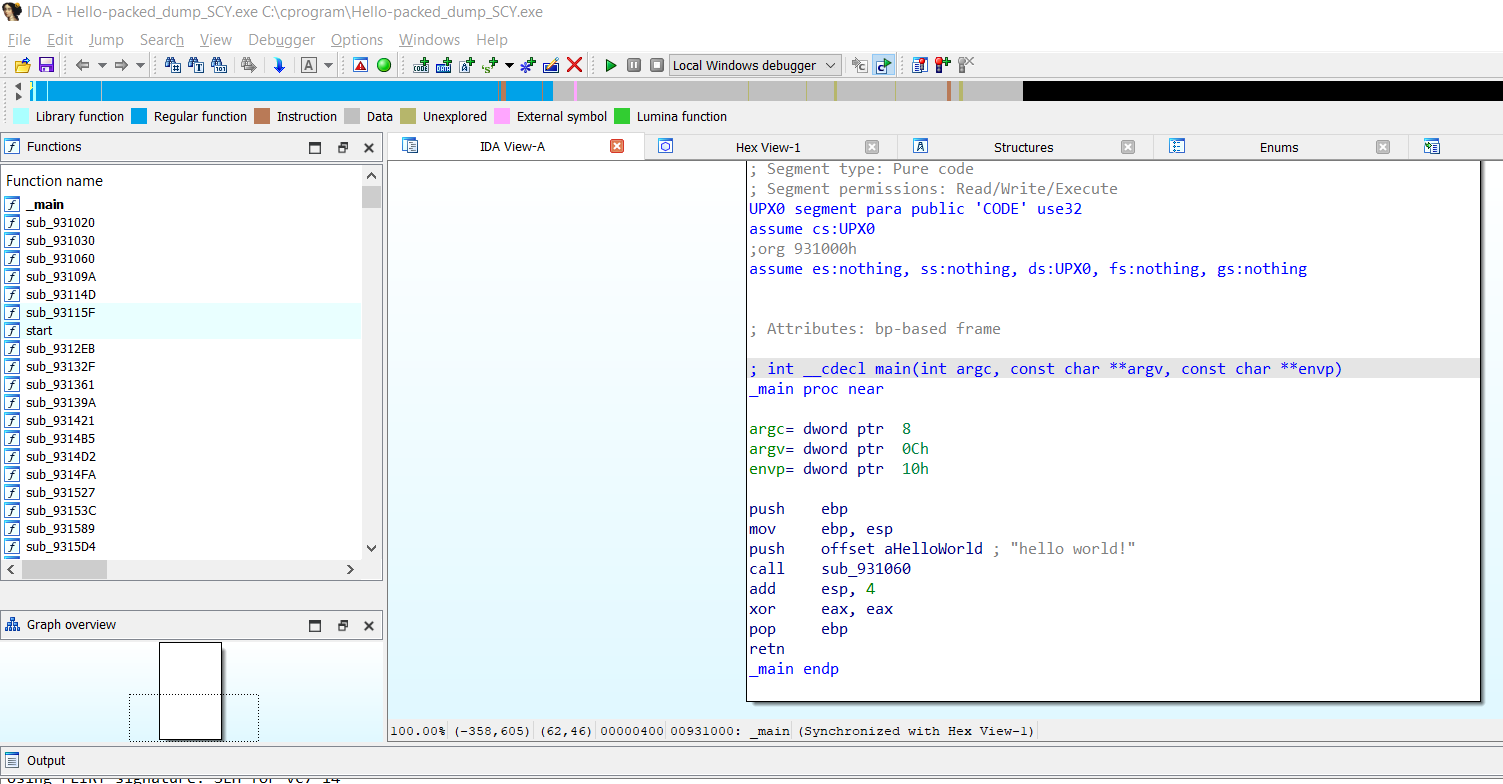
Open the dump_SCY using the IDA and check the imports tab and the graph view, here is the call for the printf() function and print Hello World!
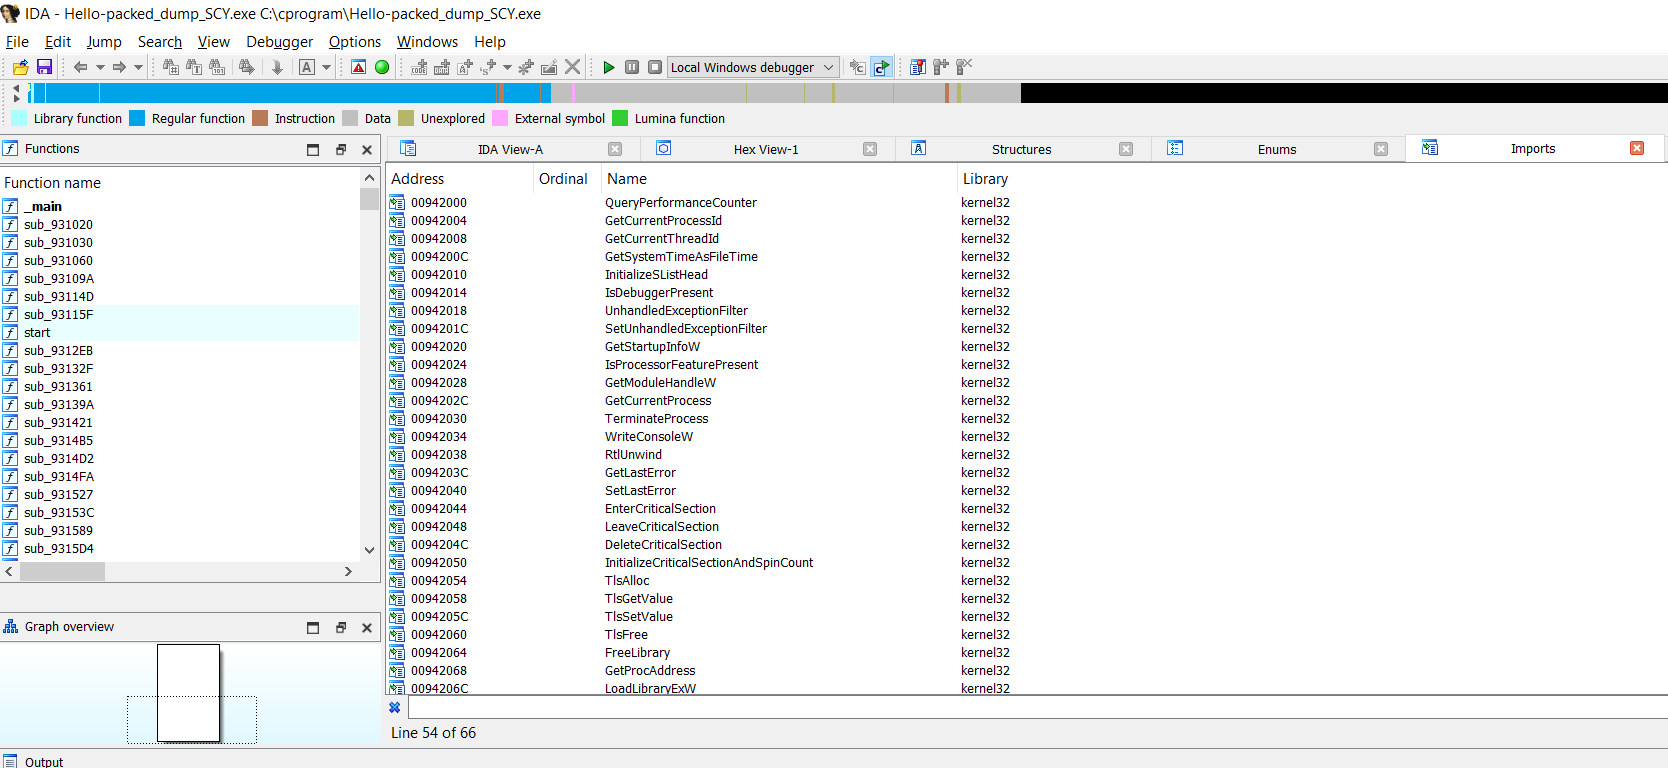
If you now check the import functions you will see more referenced functions.


Comments